Friday, September 28, 2012

Roasted Veggie Enchiladas


 I want to eat more vegetables - more fresh, locally grown, in season vegetables.  I'd like to grow them myself, but I'm finding it hard to do that while working full time and teaching piano lessons and leading worship... etc.  Confession: everything in my summer garden failed except one jalapeno plant.  And I haven't planted my fall/winter garden yet.  So what's a girl to do?  Look for a CSA!  What's that you say?  CSA stands for community supported agriculture.  You pay a local farmer a fee and get a "share" of produce.  Usually you join for a season, but I was excited to find one that lets you buy by the week.  I wasn't quite ready to commit.  I picked up my first bag last night...about 5 miles from my house.  For $20, I got a delicious cantaloupe,  beets with greens, sweet potato greens, spaghetti squash, butternut squash, eggplant, okra, and sweet peppers.  I was thrilled!  If you're interested in finding a CSA, check out Local Harvest.

I think I've only eaten eggplant once, and I don't know that I've ever eaten beets...let alone cooked with them, but I remembered reading a blog post awhile back about turnip enchiladas and the wheels started to turn.  I spent the rest of the evening reading food blogs and researching.  Then I went to bed and dreamed about vegetables all night.  Seriously.

Now I'm going to share with you the most ambiguous recipe ever...because I completely made it up.  I started by chopping the eggplant, peppers, and beets (not pictured, because they didn't look as pretty and I hadn't gotten them out of the fridge yet).


Then I tossed them with olive oil and salt and pepper and roasted them in the oven at 400° for approximately 30 minutes, until soft, tossing occasionally.


While the veggies roasted, I made enchilada sauce from scratch and wilted the beet greens.  Again, here comes the ambiguity.  I heated some olive oil in a pan, added some flour, and whisked until lightly browned.  I didn't have tomato sauce, so with my immersion blender I blended some chopped tomatoes until smooth (we buy Pomi chopped tomatoes because they're non GMO and BPA free), then added chili powder, cumin, oregano and garlic powder and poured it into the pan with the oil and flour mixture.  I added some water and a couple bouillon cubes and let it simmer, whisking occasionally.   

Then I washed the beet greens and heated them in a second pan until wilted. 


In the meantime, my nephew Samuel got creative with the okra and peppers on the kitchen table. 


When the veggies were soft, I pulled them out of the oven, removed the beet skins and chopped the bigger chunks into smaller pieces.


I poured some enchilada sauce in the bottom of my 9x13 glass baking dish (I'm avoiding aluminum and non-stick - trying to use glass or cast iron when possible, and dreaming wistfully of pricey enameled cast iron), then tossed the vegetables and greens with the remaining sauce, reserving some for the top.  I placed some veggie mixture into whole wheat tortillas, rolled them, and laid them in the pan.


When the veggie mixture was used up, I poured the remaining sauce on top, covered it with cheese, and baked until the cheese was melted.


Then we topped it with fresh, homemade salsa, ate it, and it was delicious.   


On a side note, I tasted the roasted beets and eggplant out of the oven, and the roasted beets were a revelation.  The eggplant was pretty good too.

On another side note, if people are interested, I might try to make a more specific printable of the recipe.


Saturday, September 15, 2012

Legs + Safety Razors, part 1

I've been wearing jeans a lot lately.  Not so much because of the cool weather, although I'm grateful for the cooler weather because it's giving me an excuse to cover my *ahem* not-so-smooth legs.  (Why is that so hard to write?)  No, it's because I'm re-learning to shave, and it's harder than I thought it was going to be.

I've been using Gillette Venus for years, usually the kind with the built in shave gel.  Skipping a step!  So convenient!  Automatically knowing when to switch my blade!  So convenient!  (I've been thinking a lot lately about just how much we've traded for the sake of convenience...)  I used to use Schick Intuition, then did some math and realized that the Gillette version was slightly cheaper, so I switched.  Then I did some more math.  Let's do some together.  The going rate on Amazon for the 2 in 1 (razor and gel) refill is $13.97 per 4 pack.  That's basically $3.50 per cartridge.  I shave more frequently in the summer and less in the winter, so it probably averages to about one cartridge per month for me.  $3.50 a month isn't that expensive and it's not that much plastic waste.  But then I started to think about what exactly was in those moisturizing strips and built in shave gel. What am I paying $3.50 a month for?  I dug around on the internet looking for an ingredient list, but I couldn't find one...just words like jasmine, white tea, and aloe.  But surely that's not all that's in there?  I don't have a package on hand, and I don't know if they're required to list the ingredients on the package since you're not eating them.  I'll try to remember to check next time I'm in the store.

So what's a girl to do?  I wasn't sure, but then I heard about safety razors or DE (double edge) razors.  As usual, I went to Amazon and found this guy, the Merkur Model 180 Long Handled Safety Razor.  After reading hundreds of glowing reviews, I plunged ahead and gave away my old razor and extra refills.  At $32.62, it's a fairly hefty initial investment, BUT...  I also purchased a variety pack of 35 replacement blades for $12.28.  Time for some more math.  That's $.35 per blade.  $3.50 vs. $.35.  It's almost weird how that worked out.  Maybe someone should check my math...I'm really not a numbers person.  I'll keep going anyway: if you add in the cost of the razor and divide by 35 blades, that comes to $1.28 per blade.  Still less than 50% cheaper!  And no chemicals!  Not to mention the glowing reviews.  Apparently this kind of shaving is better for your skin than dragging 14 blades across it.  Okay, I exaggerated....a little.  Many people reported less skin irritation, ingrown hairs, etc.  Popular commercial razors are not much more than a marketing marvel!

Then I tried to use it.  Apparently there's a rather steep learning curve.  You really do have to learn how to shave all over again.  I did a bit of internet research and learned that things like the angle (40°), the amount of pressure (none), the lather, brushes (badger), bowls, soaps, direction of hair growth, and multiple passes are all important.  Then, in all honestly, my first attempt was an utter fail.  I went back to the internet for more help.  One of the problems, I think, is that there are probably hundreds of videos on youtube about shaving your face with a safety razor, and none about shaving your legs.  Lots of forums and resources for men, but the only thread I found about women and safety razors was men talking about their wives using their safety razors or suggesting finding a vintage Lady Gilette on ebay.  I still watched some of the videos and gleaned what I could.  My second attempt was more successful, but did not reach glowing review status.  Apparently blades come down to highly personal preference, which is why variety packs are strongly recommended...so you can find what works for you.  I'm planning to cycle through my blades and possibly purchase a badger brush, bowl, and soap to get a proper lather (those are also quite pricey).   In the meantime, I broke down and bought some cheap disposable razors with only 2 blades and no moisturizing strip, but they're only for emergency dress wearing. I'll keep working at safety razor smoothness and update you on my progress...hopefully sooner than later.


Sunday, September 9, 2012

Simple Homemade Toothpaste

I inherited my mom's teeth and my dad's eyes. In other words, I never had braces or a single cavity...and I'm legally blind.  Seriously.  It's bad.  If you want to know how bad, just ask to see my glasses and hear the story behind them sometime.  At least I've been mostly fortunate in the dental DNA department.  But I've also almost always taken good care of my teeth.  A friend in college asked me once if I was a compulsive tooth brusher.  No, just a compulsive hand washer.

In my journey of late, I've decided that fluoride isn't for me...let alone synthetic chemicals and other questionable ingredients.  I'll let you do your own research and make your own decision on that one, but if for no other reason than frugality, homemade toothpaste is a great option.  As usual, I'll share with you my journey and where I've settled.  I researched several different recipes found via various blogs and Pinterest, and ended up starting with a combination of baking soda and water...just like my deodorant journey, which is almost weird if you think about it too much.  The first time I brushed my teeth with baking soda, I almost gagged, so I tried a recipe that included coconut oil and I added some cinnamon flavored liquid stevia to cover up the baking soda-ness.  I still didn't like it, but it wasn't unbearable.  I gradually adjusted, and now I can't even imagine brushing with commercial toothpaste anymore.  These days, I don't even add the coconut oil.  I make my toothpaste with two of the cheapest ingredients there are, and you probably already have them around your house.  

So here it is: baking soda and hydrogen peroxide.  I don't even measure.  I just make a paste out of those two ingredients and brush away.  The hydrogen peroxide whitens and kills germs.  Sometimes I add several drops of peppermint essential oil for extra minty freshness.  Peppermint oil also helps to kill germs, and may help in the treatment of gum disease.  Some people have concerns about the abrasive nature of baking soda, so you may want to use a soft toothbrush and brush gently.

I tried using a travel size plastic squeeze bottle to store it in, so I could squeeze it out onto my toothbrush, but it bubbled (the hydrogen peroxide) and oozed out and only made a mess.  I ended up purchasing a glass container from Specialty Bottle.  They have a great selection and good prices.  I just pour the ingredients in to make a paste, then dip my toothbrush in.  Slightly gross perhaps, but remember, I'm more grossed out by hands than mouths so it doesn't bother me too much.

I make smaller, more frequent batches.  As I mentioned earlier, it bubbles, so if you fill it too full it will bubble out of the container.  It also gradually loses it's bubbly-ness which feels like it translates to effectiveness.  I'm not actually sure, but just to be on the bubbly side...

At what point I feel inclined to buy other ingredients, I'd like to try this tooth powder recipe from one of my favorite blogs.  I've also read some posts about remineralization of teeth and may try this recipe at some point as well.  First on the list, though, are Izola's months toothbrush set for $12.50.  Izola’s toothbrushes are made from sustainable bamboo and nylon bristles, and they say about this set, "Our grandfather was a dentist and always told us to replace our toothbrush every three months.  The idea seemed simple enough, but months would pass and we found ourselves still using the same brush.  We needed a reminder, so we decided to put it right on the handle."  Attractive, practical, and sustainable!  What more can a girl ask for?

Have you ever tried making your own toothpaste?  Do you think you ever will?


Saturday, September 1, 2012

The Great Deodorant Debate


It took me approximately 23 seconds to decide to stop using commercial antiperspirant.  Sweat: good.  Odor causing bacteria: bad.  Sweat is one of the biggest ways our body rids itself of toxins, and as much as possible, I don't want to mess with the way my body was designed to function.  Plus, aluminum-based compounds are used as the active ingredient in antiperspirants, and buildup of aluminum in the brain has been linked to Alzheimer's disease...not to mention other things I'm trying to avoid like petroleum products, parabens, and artificial fragrances.  Deciding to switch was easy; finding a replacement I was truly happy with wasn't.  

I started with the "easiest recipe ever" that I discovered on another blog.  (I briefly looked for the post just now, but couldn't find it.)  This particular woman made a paste of water and baking soda and, voila!  I was pretty excited...easy peasy, I didn't have to buy anything extra, and you can't get any cheaper than that.  It worked great in the odor department, and I was very happy for about two weeks (even though I didn't love applying with my fingers).  Then irritation hit...hard.  

I thought that adding some moisturizing ingredients and lessening the amount of baking soda would help, so I switched to the recipe that's all over Pinterest and the blogosphere: a mixture of coconut oil, baking soda, and cornstarch or arrowroot powder.  I purchased and used the arrowroot powder because most corn produced in the US is genetically modified.  Again, in the odor and expense department I was completely satisfied, but still didn't love applying with my fingers; and though less intense, I was still dealing with irritation.

I switched to another recipe from one of my favorite blogs, adding still more moisturizing ingredients and still less baking soda.  This time, I put the concoction in an old dispenser as suggested.  I definitely preferred this method of application, but because coconut oil melts at 76° it was fairly messy and it was hard to only apply a little bit.  Also, because it is made of mostly oils and butters, it left a greasy residue on my clothes and stained my white tank tops...and I was still dealing with a bit of irritation.

I figured I would try again, leaving out the baking soda altogether, until a visiting friend asked me about crystal deodorant stones.  I had heard of them and briefly looked into them, but was initially more interested in finding something I could make myself.  At this point, though, I was irritated enough (pun intended) to warrant giving it further thought.  I read through probably 100 reviews on Amazon, and finding mostly satisfied customers and no apparent health dangers, I thought I would give it a try. 

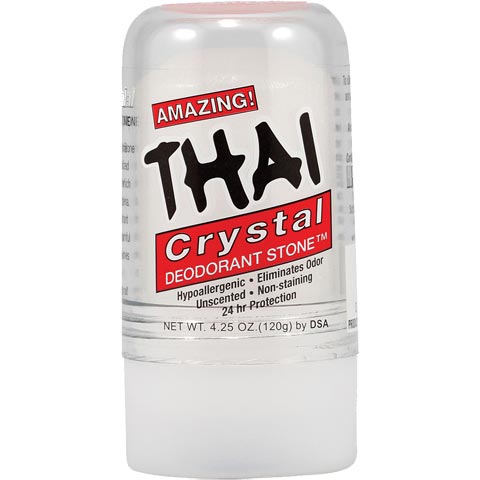
I purchased the Thai brand 4.25 oz stone from my local health food store for about $7, and I couldn't be happier!  The stone is made from crystallized natural mineral salts which kill odor causing bacteria.  Application is easy and finger-free; you simply get it wet then apply to underarm area.  It has kept me stink-free, even in 113° weather, PLUS, there's no staining or greasy residue.  Huzzah!  It's proving to be very economical too.  After a couple months of use, it barely even looks used.  I suspect this guy could last me at least a year!  Think about all those plastic antiperspirant containers that won't end up in a landfill!  I also like that except for the base, the stone is not in contact with the plastic packaging, so I don't have to worry about chemicals leaching from the plastic.  It comes in spray and roll on versions, which my sister has tried and liked, but I'm happy with the stone.

The bottom line is, every person's body chemistry is unique, and you have to find what works for you.  Not everyone will be as sensitive to baking soda as I apparently am, and many, many people have been happy with various coconut oil recipes.  But, hopefully my experiences can help expedite your process...should you choose to proceed.